Field trip diary: Part 2

Part 1 | Part 2 | Part 3

Day 6. Today was taken up with a visit to the Ministry of Commerce and Industry, to get clearance for depriving Oman of some of its rocks. This is necessary because Oman is apparently a good place to find meteorites and there’s been some trouble with people exploiting this fact commercially. Getting a clearance letter involved us walking into the ministry and going directly to the office of the Director General of Minerals to ask for one, a somewhat surreal concept for my British sensibilities; I’m fairly sure that if you were trying to do the equivalent thing in the UK, you wouldn’t be able to get in through the front door without an appointment made 3 months in advance. As it was, the clearance letter was procured with a minimum of fuss, with my only source of disquiet being that because it was written in Arabic, I had no idea what it actually said
Day 7. Our next sampling targets were located in the Jebel Akhdar mountains, a couple of hours’ drive to the west of Muscat. The peaks themselves are made up of much younger Mesozoic carbonates, with the older Neoproterozoic sequences we were interested found only in the core of the range, where upwarping combined with erosion had exposed them. Thus we were treated to some rather spectacular views as we drove over and into the wadis in the farthest interior.

JebAkPans.jpg

Continue reading

Categories: fieldwork, geology, outcrops, photos

Could an iPhone be a useful field tool?

When it comes to collecting field data, I’ve always been a bit of a traditionalist:

witr_notebook.jpg

I’m also on record as being a little sceptical about the benefits of taking shiny gadgets into the field. A traditional notebook is hard to break and will not stop working when it gets wet (assuming you have been converted to the wonders of Rite In The Rain) or gets sand in the innards, and the only thing that you can run out of are pages and pencil leads, rather than battery power.

iphone-3gs-digital-compass.jpg

Nonetheless, the fact that the latest iteration of the iPhone has a digital compass, combined with some conversations with Chris Town, and a recent post by Bob Jamieson about some iPhone applications he uses in the field, led to a bit of chat on Twitter about whether Apple’s latest object of geek worship might be of use to a field geologist. I’m starting to think that there might be some potential there, with the right software. For example:

  • With a compass and an accelerometer, could the iPhone be used to measure the orientation of dipping beds? Even if it’s not astoundingly accurate, combined with GPS co-ordinates it would be sufficient for quickly mapping out regional structures. You could even plot out the data on a stereonet as you go.

  • Geotagging photos (and now, videos) would be easy as pie, although the iPhone camera is not the greatest ever.

  • It might be possible to geotag voice memos as well, so you could quickly record observations as you go (perhaps you could transcribe them using voice recognition?)


As far as I’m concerned, there’s always going to be a place for physical note-taking; if nothing else, you can’t overestimate the value of a good interpretative sketch. But as a supplementary tool, there are possibilities. Perhaps the advantages are not so clear at the outcrop itself, but given how central spatial and location data is becoming to geological research, actually collecting data in a way where they can instantly be manipulated and analysed on your computer, rather than being forced to transcribing everything later, could be a real boon, both for research and for teaching.
However, I still have some reservations regarding the durability – or lack thereof – of devices such as the iPhone in a field setting. A good bit of kit should be tough enough to put up with rough handling and rougher weather, and even though there are some tough-ish cases out there, I’m not sure they quite fit the protective bill. Then there’s the question of battery life – although there are possible ways around that too – and, if we’re thinking about the iPhone in particular, the lack of a physical keyboard is a possible limitation as well.
Still, perhaps the rest of you have some ideas: what funky things would your ideal electronic field aid be able to do? Do you think it would be worth pursuing development in this area, or would you argue that using an iPhone-like device at the rock face would be more trouble than it’s worth?

Categories: field gear, fieldwork, geology, gifts and gadgets

Field trip diary: Part 1

Well, it’s been a while. My reasons for my impromptu hiatus are my own, and will stay that way, but I’m glad to be back. Thankfully, Anne has been providing some great content to prevent too much of a virtual tumbleweed infestation in these here parts.
The first thing to start clearing from my virtual in-tray is an account of my trip to Oman, and a discussion of what my research out there is all about. I’m going to start with the former. What you’ll discover is that on a typical fieldtrip as much time is spent travelling and logistical wrangling as is spent at the rock face. Fortunately, it does give me the chance to show off some photos.

Part 1 | Part 2 | Part 3

Day 1. The first step in any field trip is getting yourself and all your equipment out into the wild. In this instance, the start of the adventure was notably unglamorous: I was forced to get up ridiculously early to catch a long-haul flight. There’s no way to make a long-haul flight it cattle class sound exciting, because it isn’t. The best I can say is that it was uneventful, and we were fortunate not to run into problems with the Omani customs officials, despite the presence of things like hammers and drilling equipment – not the sort of thing to calm the suspicious – in our luggage. However, by the time that our journey from my flat to a Muscat hotel was finally complete, the day was pretty much over.
Day 2. The first order of business today was to meet with our collaborators at Sultan Qaboos University (one of the many, many, buildings which has been named after the current ruler of Oman). It’s a sprawling, modern-looking campus, and it was nice to see a significant proportion of the students wandering around campus were female, a noticeable contrast with the situation beyond the gates of the University, where the visible population was highly skewed towards the testosterone end of the spectrum.
In the months prior to coming out, we had been in contact with the head of the Geology department, who had offered to aid us in our sampling work. As it turned out, the assistance on offer far exceeded my expectations: on almost every day of our visit, someone made themselves available to accompany us, and direct us right to the best places to drill. The fact that we didn’t have to spend much time driving in circles trying to locate good outcrops must have, at the very least, doubled the amount we managed to get done during our trip; and that’s before you consider the assistance with accommodation, and places to eat, and sorting out car hire….
After thrashing out a rough schedule for our time in Oman, and arranging to depart for our first field area on the morrow, we had time for a little bit of tourism. We spent the evening visiting the oldest part of Muscat, checking out the harbour and an old (but still very touristy) indoor market.

Muscat_waterfront.JPG

Oman_market.jpg

For better or worse, some vendors really went overboard in honestly embracing the tackiness.

Bad_sign.jpg

Continue reading

Categories: fieldwork, geology, outcrops

The Lake Missoula megafloods

[a post by Anne Jefferson]
If I had a time machine and could go back to any point in geologic history, as supposed in this month’s Accretionary Wedge call, the event that I’d most like to see is the repeated flooding of the Pacific Northwest at the end of the last Ice Age. These “Missoula floods” are among the largest floods in Earth history and they irrevocably changed the topography of Washington and Oregon. My time machine would be an aircraft capable of flying with the floodwaters as they raced from Montana to the Pacific Ocean, and my time machine would also have LIDAR capabilities for collecting pre-, syn-, and post-flood digital measurements of topography and water surfaces and allowing an unparalleled determination of flood magnitudes and erosive volumes.
Our story begins 19,000 years ago, shortly after the Last Glacial Maximum, deep in the heart of the Bitterroot Mountains in western Montana (Figure 1), as melt water from the waning glaciers began to pour into Clark Fork River valley and its tributaries. Water in the Clark Fork ponded up behind an enormous ice dam from a lobe of the Cordilleran Ice Sheet, and reached a maximum depth of 600 meters as Glacial Lake Missoula. The lake contained more than 2000 cubic kilometers of water, more than the modern volume of Lake Erie and Lake Ontario combined. Pedestrians in the modern day town of Missoula might notice a strange horizontal striping to the hillsides surrounding town (Figure 2)…these are the traces of the shorelines of the ancient lake.

map500.jpg
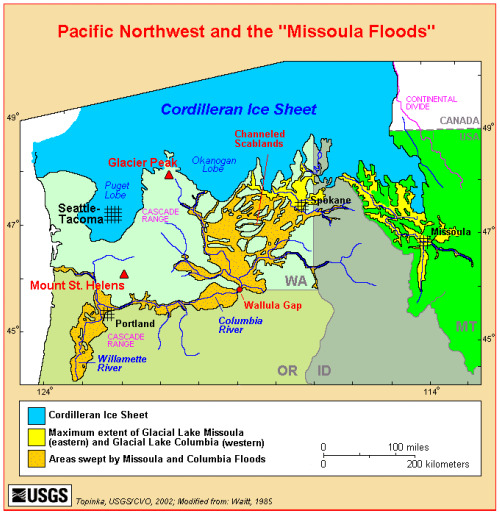
Figure 1. USGS map of the Pacific Northwest between ~12 and 19 thousand years ago.

missoula500.jpg
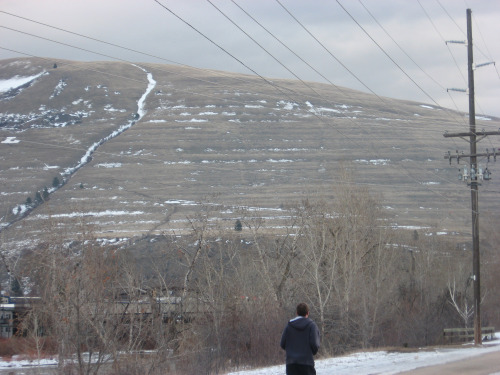
Figure 2. Traces of Glacial Lake Missoula in Missoula, Montana, February 2009. Photo by the author.

A little after 19,000 years ago, water in Glacial Lake Missoula ruptured the ice dam, and the collected water went rushing downstream at speeds reaching 100 km/hr. Peak discharge in the Spokane Valley has been estimated at 17 +/- 3 million cubic meters per second, and drainage of the lake took several days.
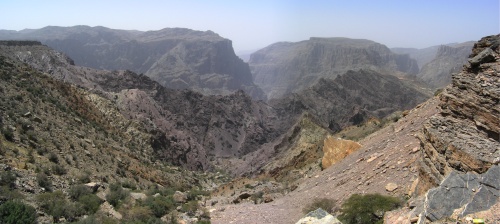
Today, the Clark Fork River drains into the upper Columbia River and then into the Pacific Ocean. At the time of the Missoula Floods, the upper Columbia was buried under glaciers and that route was blocked to the floodwaters from Glacial Lake Missoula, so instead they were forced to take an overland route, carving new channels into the fertile Palouse loess deposits and the underlying 17 million year-old Columbia River basalts of eastern Washington. These channels are spectacular (Figures 3 and 4): up to 182 m deep and 32 km wide, with dry waterfalls, scoured potholes, and streamlined islands. Granite boulders the size of small cars were carried by the flood from the Idaho batholith and deposited in central Washington. Even for geologists, it can be hard to appreciate the full extent of these floods from the ground, but satellite photos (Figure 5) show the huge aerial extent of the erosion, covering a region we now call the Channeled Scablands.

dryfalls500crop.jpg
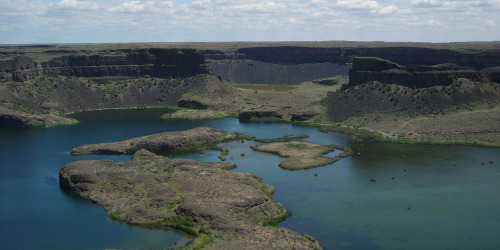
Figure 3. Dry Falls and Grand Coulee near Coulee City, Washington, June 2004. The falls are 122 m high and 5.6 km wide. Photo by the author.

scabland500.jpg
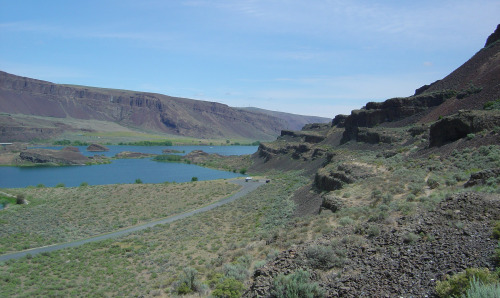
Figure 4. Grand Coulee downstream of Dry Falls as viewed from Lenore Caves, June 2004. Photo by the author.

satellite.jpg
Figure 5. Landsat view of the Channeled Scablands region. This image was taken on August 31, 1972 and shows about 34,250 square kilometers of eastern Washington. The dark green features are the channels, the light green is the wheat-farmed Palouse region and the modern Columbia River is at the top right. Image retrieved from a National Park Service website.

Several times along their way across Washington, the floodwaters found basins in which to spread out and slow down. The fertile, wine-growing soils of the Yakima and Walla Walla valleys are slackwater flood deposits of loess from the Palouse valley. In a few special places, we can see the thick layers of silt, separated by thin horizons of soil (Figure 6). The number of layers preserved in these places help constrain the number of floods, and ash layers in the soils help constrain their timing. The best estimate is that there were more than 40 late Pleistocene megafloods that crossed eastern Washington, though not all of them may have come from from Glacial Lake Missoula itself. The floods began after 19 thousand years ago, many occur after 15 thousand years ago, and some post-date a Mount Saint Helens eruption 13 thousand years ago. More than 25 floods had peak discharges exceeding 1 million cubic meters per second.

slackwater500.jpg
Figure 6. Missoula flood deposits in the Walla Walley valley, Washington, June 2004. Photo by the author.

Where the Columbia River turns east and runs along the modern-day border of Oregon and Washington, the Missoula Floods were once again confined to a single channel, at a place called Wallula Gap. As immense as the Columbia River Gorge is (Figure 7), this channel was a major constriction on the flood, only able to transmit 20% of the peak discharge. The waters therefore backed up behind the gap, flooding the Pasco Basin and creating a temporary lake – Lake Lewis – around the tri-cities region of Washington. Floodwaters in the gorge were more than 215 m deep, as evidenced by the flood deposits found on surrounding ridgelines. The town of Lyle, Washington, in the Columbia River is built on a giant eddy bar left by the floods (Figure 7).

gorge500.jpg
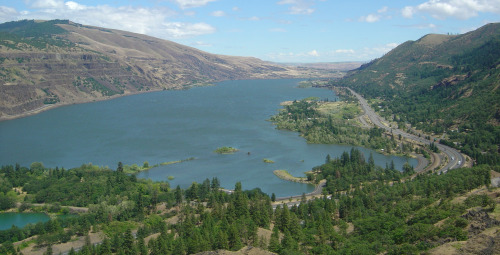
Figure 6. Columbia River Gorge, looking upstream from Rowena Crest, Oregon, June 2004. Photo by the author.

eddy500.jpg
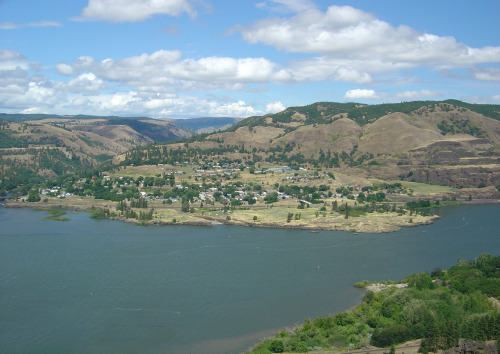
Figure 7. Lyle, Washington, as viewed from Rowena Crest, Orego. Photo by the author in June 2004.

When the floods reached Portland, Oregon, the waters filled the Willamette Valley, producing a lake 100 m deep, approximately 50 km wide, and 175 km long. Today the lake bottom is seen in the flat topography and fertile soils of the valley. Icebergs, probably remnants of the glacier that dammed Lake Missoula, were carried this far, because the valley is pocked by glacial erratics (Figure 8), rocks that had fallen onto or into the ice, were rafted downstream, and left behind when the icebergs melted. These rocks are not rounded, so it is clear that are not material moved by the flood itself.

erratic500.jpg
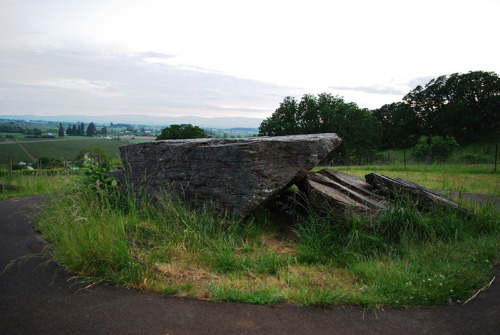
Figure 8. Glacial erratic on the edge of the Willamette Valley in Erratic Rock State Park, Oregon. Photo taken May 2008 by aboutmovies and used under Creative Commons license.

Slowly the water would drain from the Willamette Valley and upstream lakes and empty completely into the Pacific Ocean through the Columbia River. Vegetation would encroach on the new sediments, and soil would begin to develop. In the meantime, another Glacial Lake Missoula would be forming behind a new ice dam on the Clark Fork River, getting ready to repeat the process again. Presumably floods of varying magnitudes continued until the glaciers had retreated north of the river. The last floods probably occurred less than 13 thousand years ago.
Floods over, measurements completed, my time machine and I would return to the present, ready to fill in the details of the floods that shaped the topography, soils, and agriculture of the Pacific Northwest. Even without a time machine, there’s so much more I could tell you about the Missoula Floods, but I’ve already gone on long enough. Instead I’ll refer you to the numerous scientific papers on the subject beginning with those of J. Harlan Bretz in the 1920s. When Bretz proposed a megaflood as the source of the Channeled Scablands, it flew in the face of the ruling uniformitarian paradigm and his work was not accepted for several decades. The casual audience may want to check out the Ice Age Floods Institute website, an on-line USGS publication on the The Channeled Scablands of Eastern Washington, the book Cataclysms on the Columbia, and, if you can find it airing sometime, the excellent Oregon Public Broadcasting documentary Ice Age Floods. If you live in or are traveling to the Pacific Northwest, also keep an eye out for sites along the newly-approved Ice Age Floods National Geologic Trail.

Categories: by Anne, geology, outcrops, past worlds, Pleistocene

Field Pack Amenities

[a post by Anne Jefferson]
Adding to the meme begun by Short Geologist (requirements for a field hotel) and followed on by Maria (requirements for a field vehicle), I’ll present my requirements for a field pack. The topic has been on my mind a bit recently, because I’m launching a new project this summer and will be spending a non-trivial portion of it swatting mosquitoes, avoiding snakes, and collecting data.
When I go in the field, I generally go for a 6-10 hour day, departing from home, field station, or campsite and field vehicle. For me, field work has consisted of two basic types of tasks: (1) collecting samples in the field and lugging them home; and (2) downloading data from field instrumentation, with limited sample collection. As someone interested in how water interacts with the geology and the landscape, I’ve lugged rock samples for chemical analysis, hauled kilograms of salt for dilution discharge measurements, and collected thousands of water samples from springs and streams. I’ve also spent a lot of time with a backpack loaded with a lap-top and hip waders, for days when I need to download data from temperature probes and water height recorders. Occasionally I’ll have field days where I have to lug a bunch of awkwardly shaped stuff into the field in order to set up instrumentation, but I really haven’t found any graceful or systematic way of doing that. A rough estimate would be that I spent about one out of four years¬†of my PhD in the field, so I’ve spent a fair bit of time contemplating what works and what doesn’t for field packs. Pictured below is the trusty field pack that seen me through since my undergraduate days.

fieldpack.jpg

My two main field tasks would be optimally served by two different packs, so I’ll present their requirements separately below. But there are some key things that all field packs should have.

  1. A zipper compartment, preferably with clip for my wallet, keys, and cell phone.
  2. A compartment near the top of the pack for my lunch. I detest squished sandwiches.
  3. Outside pockets sized appropriately to securely hold my water bottles in easily accessible places
  4. An easily accessible pocket for a field notebook and writing implement. Maps could go here too. A GPS could go here, but is no substitute for the proper maps.
  5. Comfortably padded hip and shoulder straps that allow me to carry weight on my hips.
  6. Various straps and clips for attaching random bits of gear (e.g., rock hammer) to the outside of your pack. These straps and clips should be usefully configured for carrying things and should not just be decorative.
  7. A place to store the absolutely necessary first aid kit. Don’t leave home without it.

Sample lugging packs should have:

  1. A big open compartment suitable for dropping things in and not worrying about them until I get back to the vehicle, field station, or lab.
  2. Sufficient back padding to protect my back from any oddly protruding samples. Anyone who’s hiked miles with a piece of basalt stuck into their mid-back will know just how crucial this is.
  3. Another compartment (in addition to the list above) to hold rain gear or other protective apparel (e.g., glasses). This compartment should be accessible even when the pack is full of samples, because when the cloudburst starts, you don’t want to spend precious minutes extracting your rain gear from below your samples.

Data download packs should have:

  1. A padded computer sleeve that holds the computer close to my back and protects the computer on all four sides.
  2. Numerous compartments to hold various download cords and dongles, flagging, tools, and bits and pieces of repair items for instrumentation.
  3. A compartment for holding a limited number of samples. This compartment should be smaller than the one described in the sample lugging pack, and could also double as a place to store any portable equipment that I will use in the field. When I collect small water samples, I store them in a small padded lunch box that I slide in and out of my pack. I might also be storing a Marsh-McBirney flow meter here.

My field pack, above, is definitely of the sample lugging variety, but lately I find that most of my work is of the data-download sort. I’m hiking short distances and then collecting small water samples, making field notes, and downloading temperature probes and other loggers. My big field pack isn’t well suited for this sort of work, so I’m the market for a second field pack. I’m hopeful that REI (or the local outfitter of choice) will be able to supply me with a pack that meets my requirements. I’m also curious to know what things other people look for in field packs. Is the ideal field pack the same for a hydrogeologist as a volcanologist or paleo-seismologist? I’m not a vest-wearer. For those who wear field vests, how does that change what you look for in a pack?

Categories: by Anne, field gear, fieldwork